
How To Zone-Focus With A Fujifilm X-Series Camera
Zone Focusing With The Fujifilm X100F
As I explained in several previous posts, the X100F is an amazing camera for street and documentary photography. It is unobtrusively small and creates incredible images with and without in-camera film simulation presets. It also can be used in fully automatic mode, full manual mode, and aperture or shutter speed priority mode. And this all with automatic or manually set ISO levels. And focusing is quite quick.
But what if I need super-super-quick focusing? Focusing when I actually don't have the time to look through my viewfinder and focus before creating the image? Those are the situations when I use zone-focusing with my X100F.
In this post I will explain:
When and why I use zone-focusing;
How I zone-focus with the X100F;
Practical use of zone-focusing.
What is zone-focusing?
Zone-focusing definition:
“Zone-focusing is adjusting your lens to only have a particular zone in front of the lens in focus.”
This might sound more difficult than it is.
Imagine you are standing in a street with 20 lamp posts that are placed with equal distances of 10 feet (about 3 meters) in between, and you are standing at a distance of 6 feet (almost 2 meters) from the nearest lamp post. With zone focusing you now can decide whether, for example, the first and the second lamp post are in focus, or only the first one, or maybe the second one and the third.
Before I go into some more detail on the three things that impact zone-focusing, I want to briefly explain two other focusing terms that are very much related to zone-focusing:
Hyperfocal Distance Focusing
This basically is a way of zone-focusing whereby everything from a certain distance to infinity is in focus. For example when you adjust your lens to have everything in focus from 10 feet (3 meters) onwards.
Pre-focusing
With pre-focusing, you set your lens to the distance at which you expect to take the picture and then wait until the subject comes into focus. This can be considered a specific manner of zone-focusing where the 'focusing zone' is quite shallow.
Now back to zone-focusing. Defining focus this way is defined by three things:
The focal length of the lens you are using: the longer the focal length of the lens the shallower the focus area;
The aperture you set: the smaller your aperture number (this is: the larger the aperture opening!), the shallower the focus area;
The distance of the subject to the camera: the farther the subject is away, the shallower the focus area.
Some examples:
A 35mm lens set at f/5.6 will give a larger focus zone (more depth of field) than a 50mm lens at f/5.6;
A 35mm lens set at f/5.6 will give a smaller focus zone (less depth of field) than a 35mm lens set at f/22;
A 35mm lens set at f/5.6 with a subject distance of 3 feet will give a larger focus zone (more depth of field) than a 35mm lens set at f/5.6 with a subject distance of 60 feet.
For these reasons is zone-focusing actually only practical for lenses with a focal length up to 50mm. Lenses with a focal length of 28mm and 35mm are 'ideal' for this technique.
[note: the lens focal lengths I mention are all based on 'full-frame equivalents'. The X100F, for example, has a fixed 23mm lens, which is the equivalent of a 35mm lens full-frame]
When and why I use zone-focusing?
The examples above will help you understand that I use zone-focusing in street and documentary photography, where I use a small camera (the Fujifilm X100F), with a lens with a short focal length (35mm full-frame equivalent), and where I typically take images at a short subject distance.
So that explains the 'when' I use zone-focusing.
What about the why?
Two elements are key to create great street and documentary images: you need to be able to work unobtrusively (not to be confused with sneaky!) and you need to be quick.
While the X100F is a very quick camera, bringing the camera to your eye, looking through the viewfinder, autofocusing, and then pushing the shutter button takes time. Not a lot of time. But sometimes just enough time...to miss the shot.
Any second I can reduce the time needed to take the shot can be the difference between a nice image and a great image.
And that is where zone-focusing comes into play.
By zone-focusing the camera prior to looking for images, I can save the time I otherwise would need to focus. I just bring my camera to my eye and press the shutter release button. I would not even need to look through the viewfinder: from my experience with the camera, I know what will be in the frame by looking just over de camera or even shooting from the hip.
So the pro's of zone-focusing are: more speed and being even more unobtrusive.
How to zone-focus with the Fujifilm X100F
Now that we know what zone-focusing is and how it helps me with my street and documentary photography, let's have a look at how to do it with the X100F.
In an ideal situation for zone-focusing, you would have a lens that besides an aperture ring has a depth-of-field scale which actually indicates the distances in which objects will be in focus at a given aperture. That is why I like older lenses so much. Unfortunately, the fixed lens of the X100F does not have this. And, actually, most modern lenses for digital cameras don't have this.
[Note: some lenses, like the Nikkor DX lenses, don't even have an aperture ring anymore; but aperture can be set via de camera body]
But don't panic, here is how we can achieve zone focusing with the X100F (and basically most digital cameras):
First, set your camera to manual mode by pushing the small button on the left side of the camera all the way up to M.
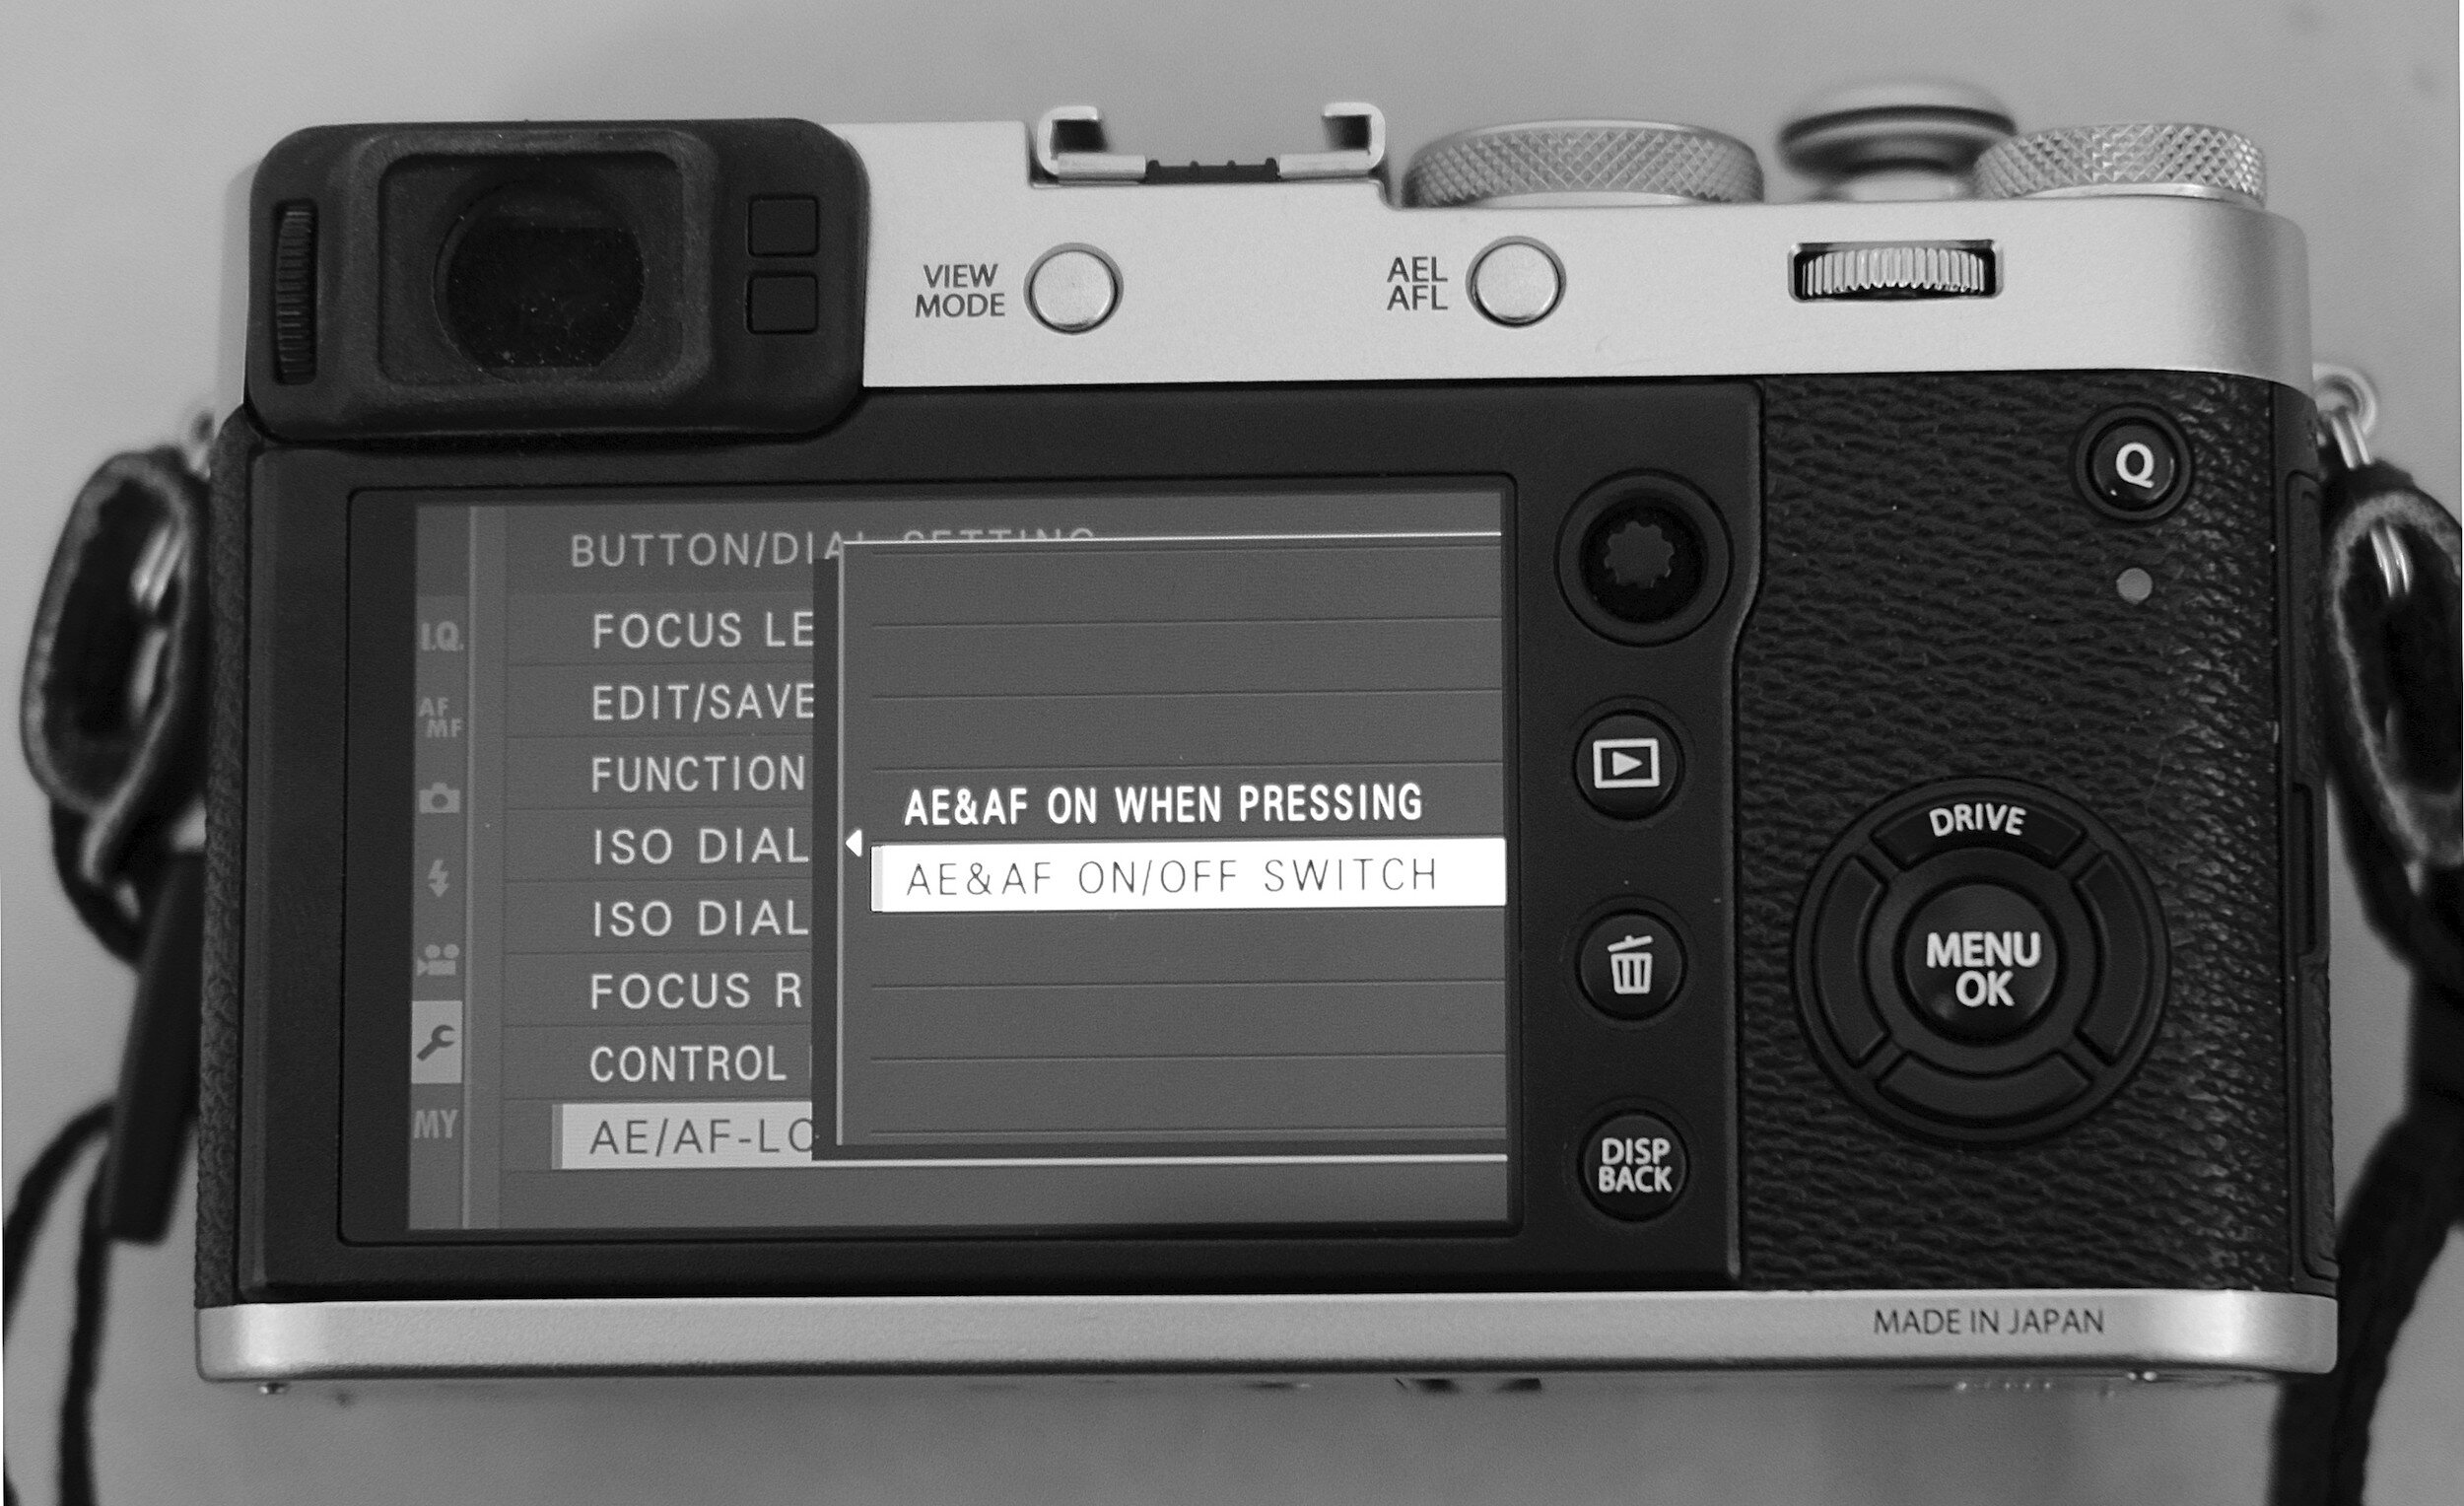
Then go into the camera menu and ensure that the AEL/AFL button is programmed to set focus every time it is being pushed and then keep the achieved focus until you push the button again. In the menu, you choose "AE & AF ON/OFF SWITCH". The image below shows the AEL/AFL button at the top back of the camera, and the menu where you can program and change the setting for that button.
Next, set the camera in full manual, or aperture priority mode. Note that when in full manual you might need to change the shutter speed given the aperture you are selecting.
And now the main trick: focus on a subject, and by selecting a different aperture you can define the depth of field for the image you are going to take: you can define the zone within which everything will be in focus. The X100F very nicely indicates that depth of field in the preview. In the images below you can see the blue bar that indicates the depth of field zone.
In the first image with an aperture of f/11 and in the second image with an aperture of f/2.8.
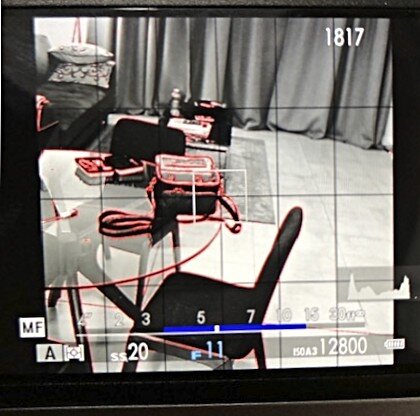
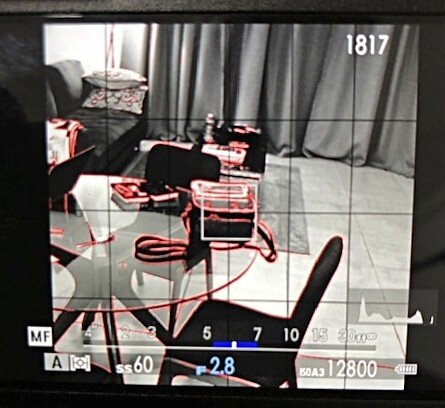
Do you notice the difference in depth of field zone, indicated by the blue bar? Without changing the focal length of the lens (the X100F has a fixed lens) or the subject distance (in both cases I focused from the same distance on the bag on the table) an aperture of f/11 provides a depth of field of about 11.7 feet (from 3.30 to 15 feet), while an aperture of f/2.8 results in a depth of field of about 2 feet (from 5 to 7 feet).
Now, you might ask, what is the practical use of this in street photography? Well, I was getting to that.
Practical Implementation
While on the street, assessing the environment I am in, and taking into consideration the type of images I want to create, I decide how much of a scene I want to have in focus; how large of a depth of field zone I want to have.
Having the camera set up as described above, I pick a point (the main focus point) at the distance I definitely want to have in focus. Next, using the AEL/AFL button, I focus on that point and by turning the aperture ring I choose the depth of field I have in mind. This way I create a zone within which everything will be in focus.
When anyone passes through that depth of field zone I just created, I only need to quickly raise my camera, ensure the subject is in the frame, and push the shutter button. And I will know that the subject will be in focus!
Picking the main focus point can be as easy as focusing on a wall, a lamppost, a car, anything that is at the same distance that you aim to be away from your subjects when taking images.
After having set your camera up and having defined your depth of field zone by setting the aperture ring and focusing on a fixed point, you can walk around and take images of anything that is within the set zone. One thing to remember, though, is to not push the AEL/AFL butting in-between because that will make the camera focus on whatever is in front of it and change your depth of field zone!
This is how I set up and use the Fujifilm X100F in the field when I want to be unobtrusive and even quicker than the camera's autofocus can be.