
How I Meter Light When Using The Leica M4
4 Ways To Meter Light When Using A Leica M4
Since it lacks a built-in light meter, I have four options to meter light when using the Leica M4: the Sunny 16 rule, an iPhone light meter app, my Voigtlander light meter, and an old Gossen light meter.

4 Ways To Meter Light When Using A Leica M4
About one year ago, when the world we live in was totally different, I acquired a pristine Leica M4 and a Summaron 35mm f/2.8.
It is a great camera, and after the first try-out, I have shot several rolls with it: both color and black and white film, especially my favorite: Ilford Delta 400.
I love shooting with this camera, not only because of the tool's built quality but also because of its relative simplicity. It is a fully manual camera, and I have only to set aperture and shutter speed for it to work. Of course, the film and the Exposure Index I decide for it to use at define ISO.
While the later Leica M5 and M6 boast a built-in light meter, the M4 lacks such frivolity, and I have to resort to other means of deciding on the 'right' aperture and shutter speed combination I want to use for each shot.
Since it lacks a built-in light meter, I have four options to meter light when using the Leica M4: the Sunny 16 rule, an iPhone light meter app, my Voigtlander light meter, and an old Gossen light meter.
Each of these methods or devices has its pros and cons, so let's look at each separately.
The Sunny 16 Rule
When I started using the camera, I started using the Sunny-16 rule to define my aperture, shutter speed combination, given the ISO of the film I was using. The Sunny 16 approach usually works very well when making images outside, especially when the light is very bright, and distinguishing between sunny, cloudy, and shadows is easy.
The Sunny 16 rule prescribes that in full sunlight, the shutter speed should be the reciprocal value of your film speed while using an aperture of f/16.
For example: when you are using a film of ISO 400, you set your aperture to f/16 and your shutter speed to 1/400 of a second (which will be 1/500 of a second for most cameras because of the available shutter speed).
Depending on the light conditions, you change either the shutter speed or the aperture to ensure you will get a correctly exposed image.
Assuming you want to keep your shutter speed at the reciprocal value of your film (in our example at 1/500 second), you would adjust the aperture as follows:

The Sunny 16 rule works remarkably well once you get used to it and learn how to read the light quality, and this is the way I currently shoot most of the time.
Pocket Light Meter App
Although the Sunny 16 rule works very well in most circumstances outside, I was not always 100% sure what my camera settings should be.
It also is my experience that the Sunny 16 rule doesn't work well when shooting inside. I eventually learned to guesstimate the right shutter speed and aperture combinations for inside situations but having a light meter still helps to get the best results.
For those times when I don't have any of my light meters with me, and I am not sure of the settings to use on the M4, I use the Pocket Light Meter app on my iPhone.
This app works very well: you select the ISO of the film in your camera and select the shutter time or the aperture. The app measures the light correctly and advises the aperture or the shutter time.
On your phone's touchscreen, you can select the point where the app measures the light.
You can adjust several settings: showing EV data, displaying white balance, setting exposure correction value, showing the focus point, and defining how to display shutter, aperture, and ISO stops (1/3, 1/2, or full).
You even can buy a Luxi Meter (the white dome to measure incident light) for your phone to use with the app.
This app works very well, and I recommend it.
Voigtlander VC II Light Meter
The best solution when I want to use a light meter is using the battery-operated Voigtlander VC II.
It is tiny and fits nicely in the cold shoe of the Leica M4.
Using this light meter is very easy. It has two dials on the top: one for ISO and aperture settings and one for shutter speed settings.
You set the ISO value depending on the film you are using.
To get a light reading, you push the orange button on the back, and three LEDs on top indicate overexposure, underexposure, or correct exposure.
You can then select an aperture/speed combination that provides a correct exposure (green light) by turning the dials.
The Voigtlander VC II has a couple of excellent features: the under and overexposure LEDs indicate what direction you need to turn the dials to get a correct exposure.
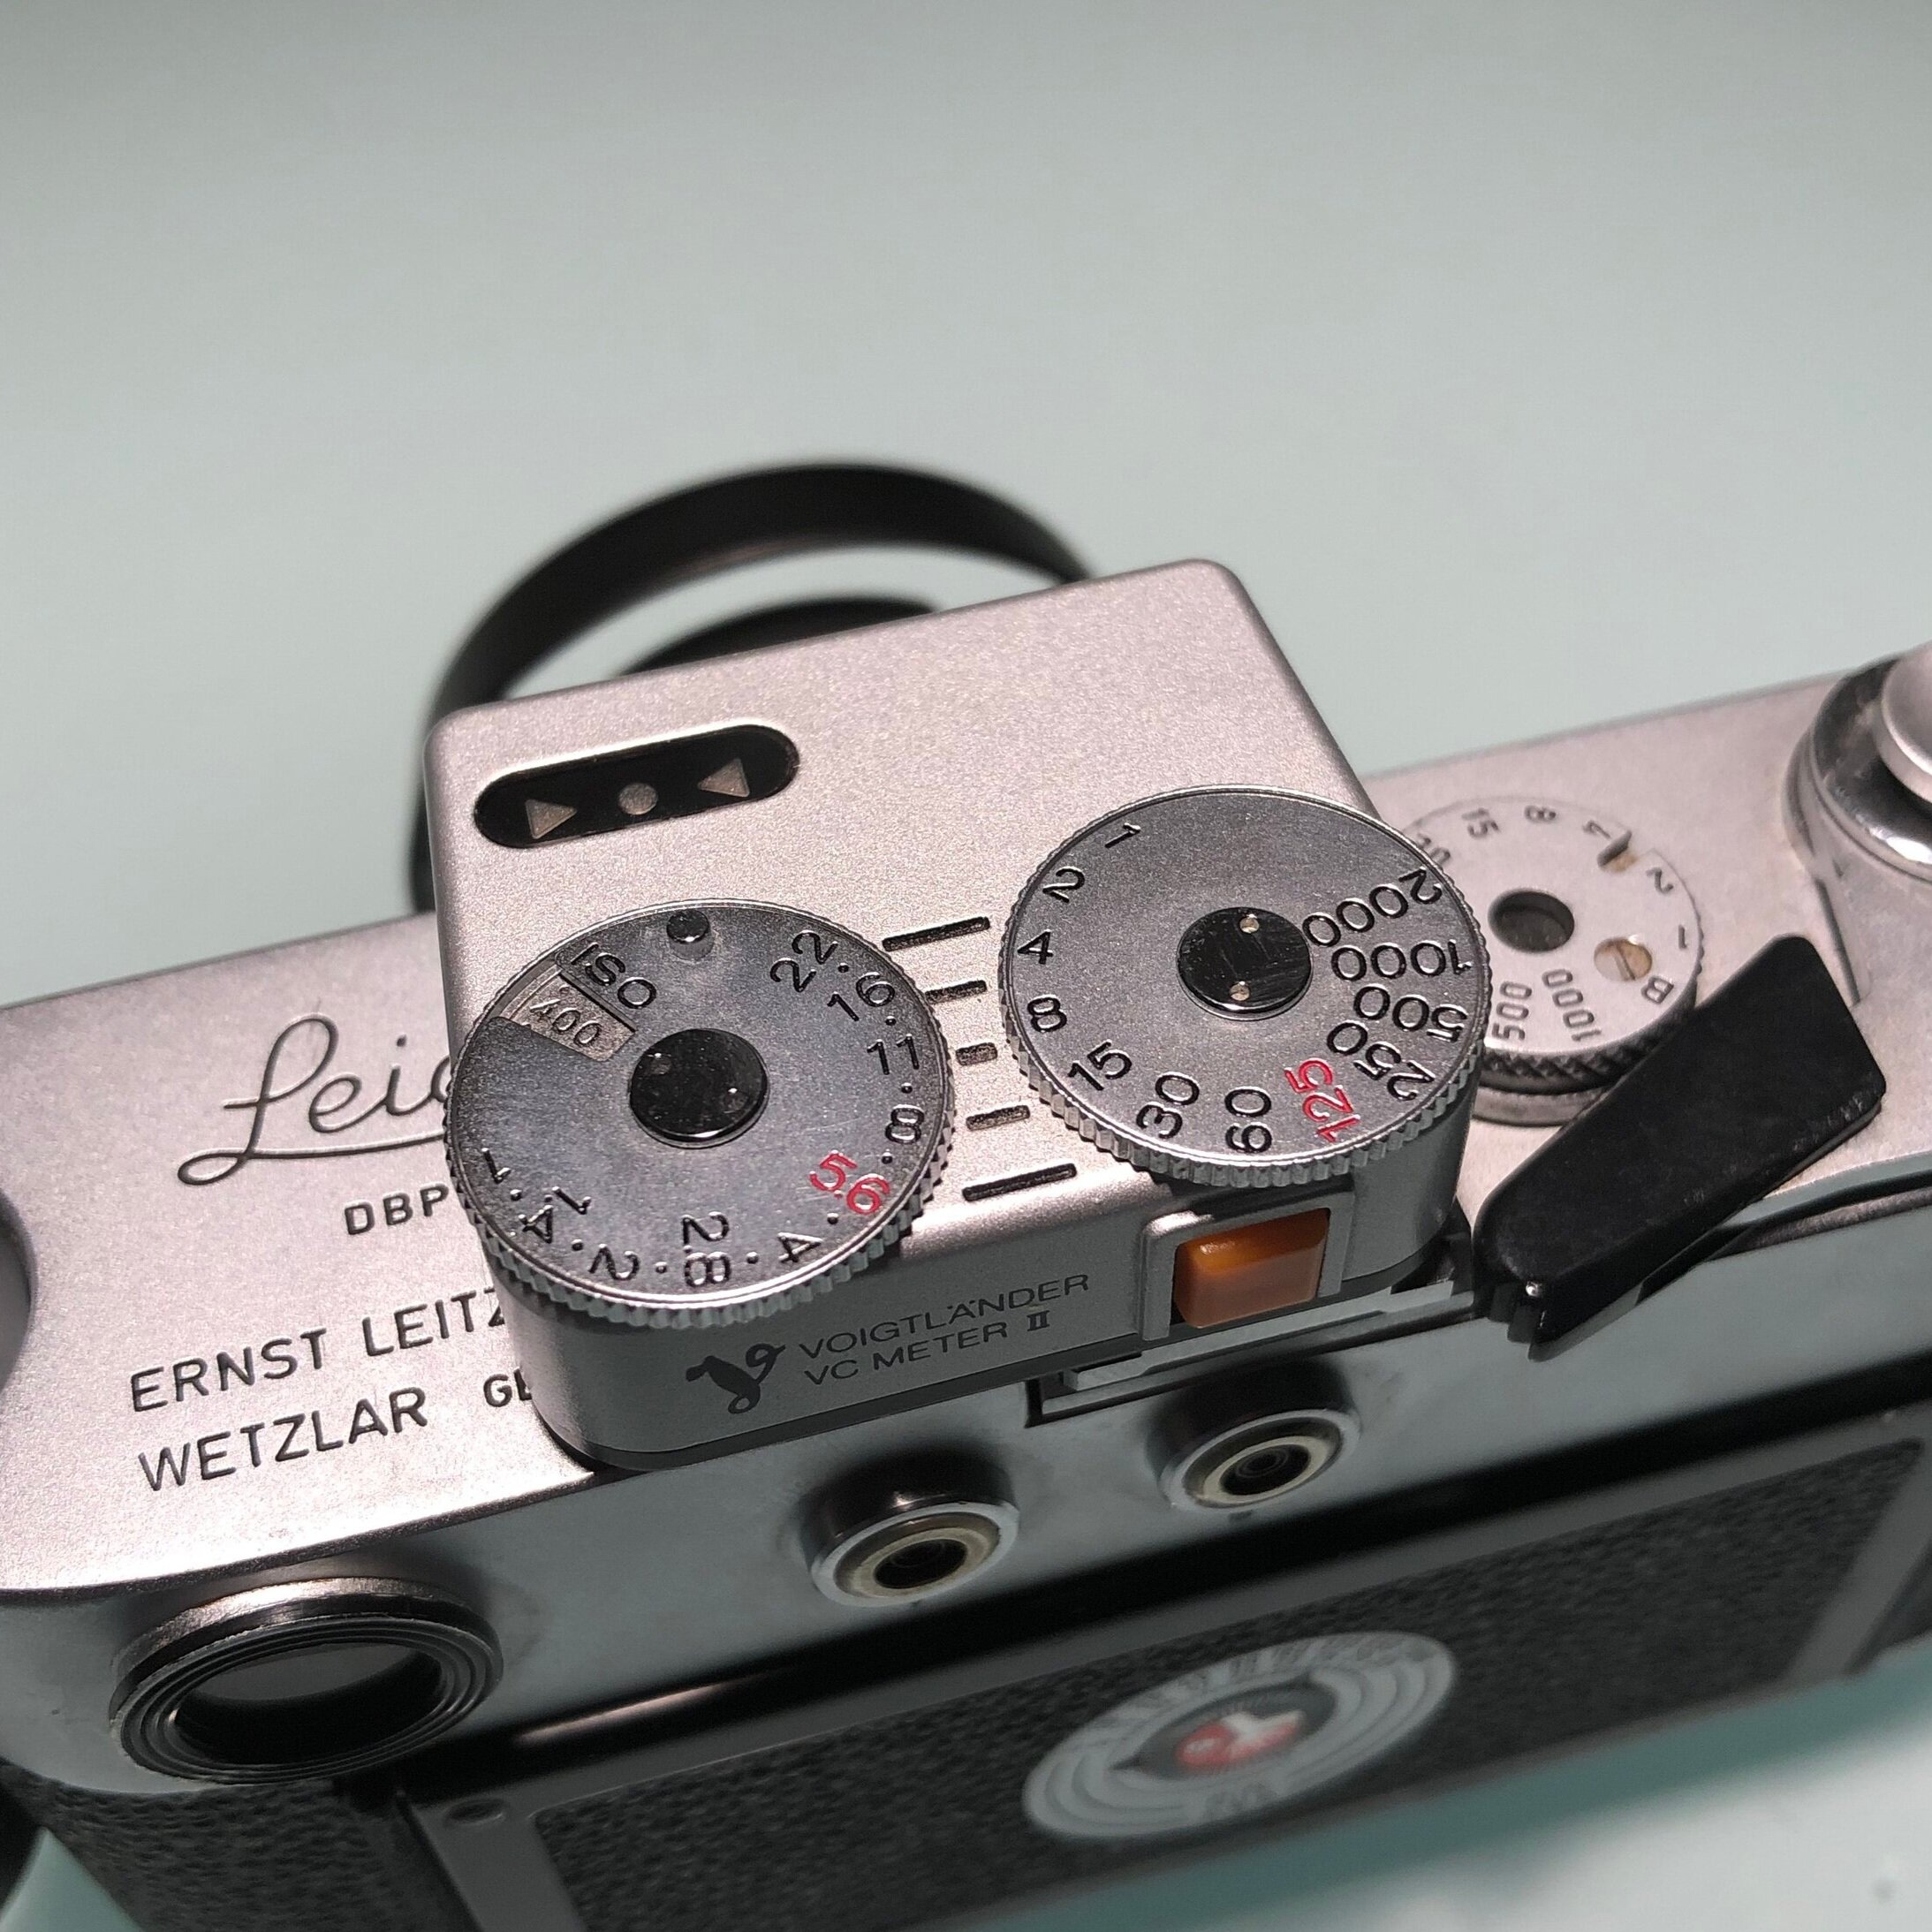
The black lines you see in the picture help to select alternative aperture/speed combinations that provide the same exposure. For example, the line in the middle shows f/11 and 1/8, but I immediately see that f/8 and 1/15 or f/16 and 1/4 will provide the same result.
A very well working and nice light meter that looks great on my M4
Gossen Pilot 2 Light Meter
One of the drawbacks (if you can call it that) of using a battery-powered light meter like the VCII is ...that it uses batteries. It is essential to regularly check the health of those to prevent taking under-exposed images or being on the streets with a not working light meter.
I , therefore, am still happy using old-fashioned selenium cell type light meters that do not need batteries, like my trusted Gossen Pilot 2.
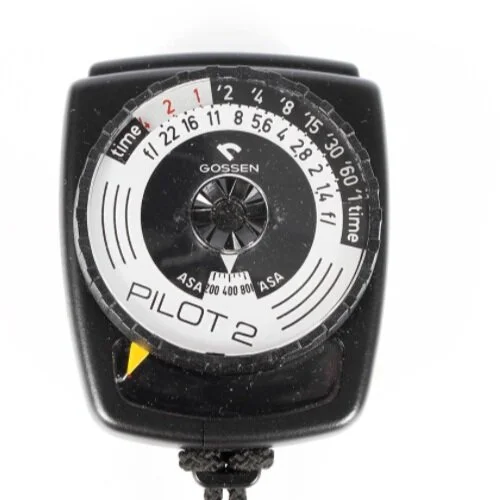
This 70ies era light meter still works excellent, and it is straightforward to use. I love this meter because it shows several exposure combinations (aperture and shutter speed) at the same time, without having to push any buttons or having to take other additional actions.
Since it is an old selenium cell lightmeter, I need to ensure that it still is working correctly. Therefore, I compare its readings regularly with the readings I get from the Voigtlander VC II and my digital cameras.
I have to admit that, when I purchased the Leica M4, I had some concerns regarding whether I would be able to get decently exposed images with a camera without a built-in light meter.
Since then, however, I have experienced great results by either using the Sunny 16 rule or using one of my lightmeters: the Lightmeter App, the Voigtlander VC II, and the Gossen Pilot 2.
How do you decide on your shutter speed and aperture when shooting with a camera without a built-in meter?

Should You Buy A Fujifilm X100F?
Is the X100F still a camera to get, now that the X100V is available?
While I was transferring some images I took with my Fujifilm X100F to my laptop, I wondered if people are still interested in this…

Is the X100F still a camera to get, now that the X100V is available?
While I was transferring some images I took with my Fujifilm X100F to my laptop, I wondered if people are still interested in this camera. And if anyone would buy this camera now that a newer and updated version is available.
Although I didn't check any statistics regarding camera sales, a good indicator might be the traffic my X100F related posts are getting.
My posts about the Fujifilm X100F continue to be among the most popular on my blog; many people are still very interested in this camera and what it can do. And I have to admit: it is a versatile camera with a lot of punch, packed in a beautifully small package.
Check the articles out for yourself:
A NEW LOCATION, A NEW X
South Africa With The Fujifilm X100F
Although this fourth iteration of Fujifilm's X100 camera is already a couple of years on the market, it still is a great camera that still ticks all the boxes:
it has a reasonably compact body (slightly smaller than the X-Pro cameras, and the pancake-like lens makes a difference);
it has the OVF/EVF combo (and some more);
it has Fujifilm's magic sensor, with excellent film simulation modes (including the famous Acros black and white film simulation);
it is a tremendously unobtrusive camera for street and documentary photography.
FURTHER EXPLORING THE FUJIFILM X100F
Exploring The Film Simulation Modes Of The X100F
Although I am not a proponent of just copy-pasting presets, the results from the presets developed by Ritchie Roesch have me wanting to experiment more with presets. Maybe tweaking them a bit more, perhaps experimenting with some other film simulations.
TAKING THE FUJIFILM X100F TO NEW YORK
New York City And The X100F With Film Simulation Settings
My first real experience with the X100F came when I had to go to New York for a visa application, and my schedule left me with plenty of time to explore the city and put my Fujifilm X100F to work. Shooting the streets of NYC provided an excellent opportunity to use some of the presets I discussed in my previous article: Acros Push Processed, CineStill800T, Velvia, and Agfacolor.
FUJIFILM X100F PRESETS EXPERIMENTATION: IT'S A WRAP
What I Learned From Using Film Simulations And In-Camera Presets With The Fujifilm X100F
The main points I learned from using film simulation presets were:
Understanding how these settings impact the RAW file and produce the straight out of camera JPEGs
Understanding how other camera settings affect these settings and the final JPEGs
Knowledge how to tweak or built my film simulation settings
HOW TO ZONE-FOCUS WITH A FUJIFILM X-SERIES CAMERA
Zone Focusing With The Fujifilm X100F
This article explained how to set up the X100F for zone focusing.
By zone-focusing the camera prior to looking for images, I can save the time I otherwise would need to focus. I just bring my camera to my eye and press the shutter release button. I would not even need to look through the viewfinder: from my experience with the camera, I know what will be in the frame by looking just over de camera or even shooting from the hip.
TAKING THE X100F TO MADRID
Street Photography With The Fujifilm X100F In Madrid
During a trip to Madrid, Spain, I took the trinity with me with the intent to shoot some street photography.
The Fujifilm X100F was, according to plan, used during night time.
In Conclusion
I still love my X100F, and with the old and reliable X-Pro1 and the Leica M4, it forms my ideal camera trinity.
The traffic to my blog posts about this camera indicates that people still are interested in this version of the X100 series.
But of course, if the cost difference today between the X100F and X100V is only $100...
Should you get the X100V if this is your first X100 camera? Absolutely! Should you upgrade to the X100V from an X100F? I don't think the money you will lose selling the older camera is worth it.

7 Lessons I Learned From Visiting Art Galleries And Museums
Photographers should regularly visit art galleries and museums to learn from other artists
Being a photographer, there is quite a chance you not only express yourself with visual content; you also are…
Photographers should regularly visit art galleries and museums to learn from other artists
Being a photographer, there is quite a chance you not only express yourself with visual content; you also are a visual learner. This means that you best explore and learn by seeing things.
What then, could be a better place to learn than an environment that focuses on visual expression: an art gallery or museum.
I encourage all photographers to regularly visit art galleries and museums, and any other place where art is being exhibited, to take advantage of the learning aspects looking at art provides.
Why? After the break, 7 lessons I learned from visiting art galleries and museums.

1 Discovering artists
How many visual artists are there globally? I don't know. But, depending on how you search for this on Google, you get from 'hundreds of thousands' to 'millions'.
Do you know them all? Have you seen work from all? Probably not. I for sure have not!
Instead of randomly searching the internet: go to an art gallery or museum. Not only will you probably discover a 'new' artist, but the gallery owner or museum info desk most likely will also have some background information available about the artists and the art on display.
Similarly, while it is great, and easy, to browse the internet for images and photographers, experiencing photos in print is a total game-changer.
Even the best digital rendering of an image on a great quality screen can not compete with the real thing. Especially not when it is a large or very large format print.
You just must have experienced this to understand what I am saying. So, find the nearest art gallery or museum and look at some prints.
And while you are there: check out the gallery or museum shop, they probably will have some nice photography books to take home.
2 Learning about style
Looking at art in art galleries and museums provides a great opportunity to learn about style.
How did the artist use color or tonality? how was composition used? What can you learn about structures and textures in the artworks?
Whether looking at photographic prints, paintings, two-dimensional or three-dimensional art: try to discover how the artists used their medium to express themselves and to get their message across.
3 Photographic Techniques
When visiting art galleries or museums to look at photographic prints there is a lot to learn about photographic techniques.
While photography is not as much about the tools used as about the photographer's vision, learning about tools and techniques can improve your images.
See the differences between photos created on 35mm film, medium format film, and large format film. Experience the impact of using a large format camera or a pinhole camera.
Learn about different street photography techniques, Dutch angles, and the difference between available-light and flash photography.
4 Printing
Look at the images on display and learn about different printing techniques. Was the photo developed in a traditional wet darkroom process or was it printed digitally?
And then the different techniques for each of these! There is so much to learn: archival pigment ink prints, aluminum prints, daguerrotypes, wet plate collodion, albumen, digital-C prints, and many more techniques.
5 Presentation
Staying with photography and painting for a while: learn about the impact of how images and paintings are being presented.
Starting with how prints are being matted and framed, to how they have been placed in the display area. Notice how space and place where images are being displayed impact how they are being perceived?!
Notice the lighting of the images in the art gallery or museum!
6 How to write captions and information
Part of displaying art involves writing captions and other information. Does the artwork have a title? If yes: how does that impact your perception of it? If no: how does thát impact your perception of it?
Is there any information about the art on display? Whether it is an open edition, a limited edition, or a unique piece? Information about the medium and tools used?
How does that information influence how you see and perceive the art?
The curators of most art galleries and museums have perfected the art of writing captions; learn from it!
7 How to approach and see an object
When you are a photographer there probably is a chance that you specifically go to art galleries and museums to enjoy photographic art and maybe paintings.
But do not ignore the three-dimensional artworks on display. There is a lot to learn from those too!
Every time you look at a sculpture or an installation, you could do the following short pre-visualization exercise:
Try to imagine how you would take an image of the object on display. What camera and lens combination would you use; what angles (composition!) would you use; how and on what medium would you print your image; what lighting would you apply?
You see (no pun intended) how much you can learn from visiting art galleries and museums? How it can improve your photography?
I very much encourage other photographers to explore art; one of the reasons I post my ongoing articles with Weekend Gallery Tips on my Facebook, Instagram and Twitter pages.
So next weekend, get out and visit a gallery or museum to experience some great art and enjoy a learning opportunity to improve your photography.

What Everybody Should Know About The Photographer's Brief
What Is A Photographer’s Brief And How To Write One
Before going into the details of what a photographer's brief is, why you should have one, and what its content…
What Is A Photographer’s Brief And How To Write One
Who Should Write A Photographer's Brief?
Before going into the details of what a photographer's brief is, why you should have one, and what its content should be I want to spend some thoughts on who should write one.
Usually, the brief is written by the client for a commissioned photo project or photoshoot. As we will see below, this is done to create clear expectations, guidelines, and deliverables for and with the photographer.
A photographer's brief, however, can also be written by the photographer. For example, if the photographer has a project in mind for a client group or a specific client and needs to convince the client to (literally) buy into the concept of the project. Or to ensure the photog is clear about the objectives and execution of a personal project.
Summarizing who should write one:
clients who need photographers to produce specific images
photographers who need to 'sell' a project to clients
photographers who are working on personal projects
Reading the information below, keep in mind then that the brief can originate with the client, to provide clear direction and needs to the photographer, or with the photographer, to sell a project to a client or to ensure a personal project will cover all bases.

What Is A Photographer's Brief?
In its most basic format, a photography brief is a summary of agreements and requirements between the client and the photographer or, if it is for a personal project, a guideline the photographer sets up for themselves.
The brief provides the objectives of the photoshoot or project and other information that provides the photographer and, when applicable, the client with an overall view of the project and how it needs to be executed. It is a document that helps to understand what the client or the photographer really wants to achieve with the project.
Why Write A Photographer's Brief?
From the photographer's perspective, irrespective if it is for a client or for a personal project, the brief provides guidelines regarding the output needed, the equipment to be used and the targeted audience of the final product. In other words: the photographer's brief will provide sufficient information for the photographer to make decisions regarding logistics, technical issues and the creative part of the project.
From the client's perspective, the photographer's brief will clarify quality, budget and schedule for the project. The brief should give the client all key information to review the photographer's quote and execution plan for the commissioned project, including information regarding the style of the final images, rights for usage, cost and the actual deliverables.
A well-written photographer's brief will ensure that all parties involved are on the same page regarding objectives and deliverables; it can make the difference between great images that convey the message you are trying to communicate and the photographer delivering something that doesn't fit the bill!
So the question of whether you should write a photographer's brief needs to be answered with a definite 'yes'! Whether you are a client looking to commission a photographer for a project, or you are a photographer who wants to 'sell' a project to clients or is working on a personal project.
What Should Go In The photographer's brief?
My advice is to start with the basics and then elaborate on all key elements that help to align the client and the photographer on the project, it's execution and it's deliverables. Or to help the photographer to better understand his objectives for and the execution of their personal project.
The name of the client:
Even when it is a personal project, put your own name on the brief: it helps to take ownership of your project and will remind you that the right execution of a personal project is as important as that of any commissioned project.
The name of the project:
For commissioned projects, this can be just a denominator of client, project and year, or a project name provided by the client. For commissioned and personal projects a creative project name can help determining and remembering the objective(s) of the project and what the client or the photographer wants to communicate through the final images.
The project's objective:
This is a more elaborate description of what the final images should communicate. What is the mood and feeling that needs to be conveyed, who are the targeted audience, is it for a specific advertisement, should it tell the story of a brand, how and where will the images be displayed (e.g on a web site or in print)?. All these elements will provide alignment between the client and the photographer about what needs to be accomplished.
For commissioned projects it also is important to include general information about the client and their brand in the photographer's brief: maybe the photographer is not knowledgeable about the brand or the details of the brand and providing this information will help them better understand what the client's communication style in general is. If the client has a brand style-sheet, this should be mentioned in the photographer's brief and shared with the photographer.
Also, don't forget to mention how many images are needed!
Location, location, location:
The photographer's brief needs to include information about the location or locations the photoshoot(s) will take place. This not only helps the client and the photographer with the revisualization of the final images, but it also will help to determine if specific permits or safety measures are needed to successfully be able to shoot at the selected locations.
Also, think about and mention alternative locations in case permits can not be obtained, the initially selected location can not be safe, or the weather suddenly changes during the shoot.
An overview of the images:
The photographer's brief should include a list of images the client would like the photographer to capture (or the photographers envisions for the commissioned or personal project). This 'shot list' will help the client and photographer to understand and agree on what to photograph to achieve the project's objective, and it also will help the photographer determine the scope of the project, the necessary equipment, and the set-up and staging requirements.
Schedule:
If it is for a commissioned project the client probably will have a deadline set for the images to be available. For a personal project, scheduling is important to ensure the project will not interfere with possible commissioned projects, while at the same time ensuring the personal project will not be postponed indefinitely because of the photographer's busy commercial schedule.
The photographer's brief also should contain information about what happens when the schedule can not be met; whether this is because of something the photographer is responsible for, something the client is responsible for, or an 'act of God'.
Contact details:
If the images to be produced will need to contain specific people (models, the client's employees) the contact details of each individual need to be included.
Things can go wrong: the weather might suddenly change during an outside shoot, equipment might break down, props are not delivered on time. Make sure the photographer's brief includes contact numbers for everyone directly and indirectly involved in the project. This includes the client or their representative on-site, the photographer and suppliers of anything needed during the shoot (don't forget supplier who can provide back-up equipment!).
Responsibilities:
Each photographer's brief also needs to include clear definitions of responsibilities. What are the photographer's responsibilities, what are those of the client? Remember that things can go wrong and it should be very clear upfront who is responsible for what to prevent uncomfortable or even nasty situations afterward.
The final deliverables:
Does the client need prints, jpeg's, raw files? How will the images be licensed? Does the client want the images already edited or will they take care of that? If images need to be retouched by the photographer, is there a specific style needed?
Budget/Cost:
For commissioned projects, the client should indicate the budget available or the photographer should indicate rates and total cost. Will travel costs be covered in the overall project rate, who carries the cost for models: will the client take care of that directly or is the photographer supposed to arrange and pay? The same for the cost of location, permits, props.
Miscellaneous:
Finish the photographer's brief with any miscellaneous information that helps to align client and photographer regarding the objectives and execution of the project. This might include topics like dress code: it would be awkward for photographer and client if the former would show up at a formal-dress event wearing jeans.
In Conclusion
A photographer's brief is an important tool to achieve alignment between a client and the photographer regarding the objective, the execution, the deliverables, schedule, budget/cost, and quality of a project.
For commissioned projects, the photographer's brief can be provided by the client or by the photographer. In either case, it is important that both parties align and agree on its content.
A photographer's brief can also be a great tool for photographers when working on personal projects: to get clarity about their objectives for the project, to manage cost, and to ensure that the personal project's schedule doesn't interfere with any commercial work while at the same time ensuring the personal project will not be postponed indefinitely.

How To Choose A Social Documentary Photo Project
What I Look For In A Photo Project - And One Big Mistake To Avoid
The first step in my personal approach to creating photo essays is defining the ‘what’ of the project…
What I Look For In A Photo Project - And One Big Mistake To Avoid
The first step in my personal approach to creating photo essays is defining the ‘what’ of the project.

Each project starts with finding something to tell a story about.
For me that story needs to intrigue me, needs to be able to capture and hold my interest; it needs to be a story that I think is worth telling or one I think needs to be told.
It also needs to be a story which, for me, is practically feasible to be told: I need to be able to make time for it and I need to have access to the right people and/or situations to create the images I pre-visualized.
Ideally, and while integrity and safety should never be compromised, creating the images also will have me push some of my boundaries. From a personal and from a photographic, technical perspective.
This, however, could lead to an important mistake when creating social documentary photography. Although I like to create documentaries that provide a technical challenge, that improve my photography, and my editing and sequencing skills, the story should never be about ‘me’.
With this I mean that the project needs to be story-driven, and not be author-driven; the essay should never be about showcasing my photography or writing skills.
And that brings us back to the ‘why’ of my social documentary projects, as I shared a couple of articles ago.

How To Create A Photo Essay
My Personal Approach To Photo Essay Creation
In previous blog posts, I explained ‘what’ documentary photography is, and the reasons I want to create this…
The Photo Essay: My Personal Approach
In previous blog posts, I explained ‘what’ documentary photography is, and the reasons I want to create this type of imagery; my ‘why’.
Every photographer who works in this genre of photography probably has their own approach, guiding principles and workflow for creating their stories. In this article, I will share my personal approach to creating a photo essay: the ‘how’.

Each project starts with finding something to tell a story about
This can be a subject or involve an approach that will help me to push my boundaries. Or it can be about someone or something I am quite comfortable with. I don’t think a good photo documentary is depending on how ‘big’ the topic is, or how challenging it is to create the images. And I am certainly not going to put myself into a position that my own or other people’s safety or integrity will be compromised.
It is important for me, however, to work on a story that will hold my interest. I am not a photojournalist, and since I know that my attention span generally is quite short (and that is not only applicable to photography) to successfully create a photo documentary I need to find a topic that intrigues me sufficiently to keep working on it for a prolonged time. That entices me to continue exploring, continue asking questions.
Next up is research
After having defined my topic I need to get background information: about the topic in general, where I best can get subjects for my images that support the story, what type of shots will tell this particular story best, what camera to use and, if applicable, what film to use.
While a lot of research for a photo documentary can be done online, I prefer to also get information offline. If possible, I want to go to the area where I will create my images without a camera first. Just to observe: the environment, the people, situations, light, angles of view.
Sometimes I use a program called Milanote for storyboarding on my computer: this helps me to visualize how I want to execute the project.
Whatever the outcome of the research and my subsequent planning for execution, however, I am also open to the unexpected. When starting the actual shooting I might stumble on something, someone, or a situation I did not consider to be part of the documentary which however will make a great addition. Or diversion.
Creating the images
Whether working digital or with film, for my documentary and candid photography I usually only use two focal lengths for my lenses: 35mm and 50mm (full-frame equivalents for digital). I do this to achieve consistency in my images. When I need to create different viewpoints, I do so by changing perspective and distance: zooming with my feet. Furthermore, being very accustomed to the angles of view of these focal lengths helps me with my composition.
When working on a documentary project I want to really take my time and not rush it. I want to get to thoroughly know the subject of the project and, if possible, the people that will be in the images: developing trust, report, and collaboration. Even when it involves a project where each image is a once-off; as I am planning for my Southern Convenience documentary: an essay focusing on the small, often family-owned, convenience shops that service large parts of the backcountry here in the South.
Projects take a long time to create: I prefer quality over speed. That is why I also like to create candids.
Culling and sequencing
A lot, probably most of the work gets done after the actual shooting: culling and sequencing of the images.
When working on a project I take hundreds of images. These, of course, don’t make it all into the final essay. I usually start with a first culling session on-screen: I place all project images in a special album in ON1 (my image management and editing software) and by quickly going through them I am usually able to delete quite a few from the get-go.
For the next stage, I make a contact print from ON1 of all remaining images. These are then reviewed in a process that usually takes a couple of days. Reviewing, letting them rest for some time, reviewing again. And so on. It actually works quite well for me to strike images that don’t make it through with a pencil.
This usually boils the stack down to about 30 to 40 images. These I print as individual 4x6 images on my regular printer, or I have them quickly printed at a drugstore.
Those final images usually end up on the dining table for final culling and sequencing.
Finishing the project
After having selected and sequenced the images for the project, I ensure that only the final selected images stay in the project album in ON1. After making possibly needed final adjustments (since this is a documentary project, I do not crop and only make some minor exposure adjustments and/or convert to black-and-white) these images are ready to be placed in the Essays section of this website.
Although the visual story is the most important part of each essay and it is said that “an image explains more than a thousand words” I always add some text. Sometimes this is only a project introduction, sometimes this is a more elaborate narrative to explain the background of each image or to make the viewer aware of the not-so-obvious in the images.
Since I am a strong believer in printing my images, I also print out all images at 8x10 format. These images are archived with a printout of the essay as published on the website.
Depending on the size of the project or if combining some projects makes sense, I also will create a photo book or a zine.

The Importance Of Social Documentary Photography
4 Reasons I Create Social Documentary
Two weeks ago I explained what social documentary in general is and how I define it for my work. Call it the ‘what’ of social documentary photography.
4 Reasons I Create Social Documentary Essays
Two weeks ago I explained what social documentary in general is and how I define it for my work. Call it the ‘what’ of social documentary photography.
More important than the ‘what’, however, and what I want to share this week, is the ‘why’ of this photographic genre: in general, and for me personally.
Guided by my vision to show the viewer the not-so-obvious and using the documentary narrative, I aim to create images for my essays that tell a story; inviting the viewer to ponder questions about our society, environment, and how we as people live together.
The above points provide two reasons why in my opinion social documentary photography is important:
to make us aware of things and situations that are not always obvious;
to document what is considered to be ‘normal’ today;
Two other reasons why social documentary has an important role are:
to explore our (social) environment; and
to ask questions about what we see.
After the break, I will elaborate on each of these four reasons.

Let’s start by exploring why it is important that social documentary photography makes us aware of things and situations that are not always obvious to us.
As I explained in the previous article, this type of photography does not always have to be about ‘big’ issues: it includes showing everyday life as it happens around us. Showing the mundane, the everyday environment and human interactions can make us aware of situations or things that we did not notice before.
Have you ever walked through a street that you have walked on before, maybe daily? And have you maybe looked up someday and looked at the facades of houses, surprised by what you saw?
Or do you pass an office building every day without ever looking inside through the windows? And then, one day you did and realized people are working there?
There is a lot in our day-to-day life that we just take for granted or don’t notice. Social documentary photography will help to recognize these things, people, and situations and make us aware. This can enrich our lives or trigger an action we would not have taken otherwise.
Related to this is the pure ‘documentary’ function of this genre of photography. There is so much that we consider being ‘normal' that we forget that the tools we use, the clothes we wear, the things we do and the ways we do these, the food we eat, probably will be different in the future.
People in the future probably will have an interest in knowing about this, knowing about how we worked, played, lived and thought. Have you ever looked at a photograph from the 1800s or even from the 1970s and wondered how people then lived? Or wondered who the people in those photographs were? Images we create today are documenting these same things for people in the future, who probably will look with the same wonder at our lives. That, by the way, is an important reason to print images!
The third reason is related to exploration. Social documentary photography helps us to understand the world we live in, make sense of it, and discover how other people live. It is for that reason, as mentioned, that it is important that the photographer documents day-to-day scenes and not only the ‘big news’ features. We can learn from just looking at images of other people, whether in our cities or at the other end of the world. And to learn about these people and their cultures we need more than selfies, landscapes, or travel images. We need images created by photographers who have a genuine interest in how people live and sharing those with the world.
And this, finally, brings me to the fourth reason for the importance of social documentary photography. Being made aware of our social environment, our own ‘normal’, and that of other people can trigger questions. Sometimes just out of curiosity, sometimes to question the status quo, sometimes even triggering action to ask more and drive for changes.
Yes, ‘big’ documentary is important to show the big issues (war, famine, injustice) to the world. But social documentary photography as I see it has its own important role to help people become aware, recognize, explore, and ask questions about ourselves and the world we live in today.

What Is Social Documentary Photography?
My Personal View On Creating Social Documentary Work
The sub-header on the front page of this website says “Street & Social Documentary Photography”…
My Personal View On Creating Social Documentary Work
The sub-header on the front page of this website says “Street & Social Documentary Photography”.
In this article, I will explain what Social Documentary Photography in general is, share my personal view on this genre and explain how it defines the type of images I create.

Social Documentary Photography is a sub-genre of Documentary Photography, which usually refers to photography as a means to document historically important events (e.g. wars, political events). As a result, most people usually associate Documentary Photography with professional photojournalists or documentary makers. This is what I would define as ‘hard’ documentary photography.
Documentary Photography can be distinguished from photojournalism in that it is not focused on on-time, breaking-news-events but focuses on documenting something over some time. Some documentary projects actually can take years to get finished.
When the images and documentaries created concern social or environmental themes, we then usually call that Social Documentary Photography.
This type of photography is often associated with photographers providing a critical review (sometimes: assessment) of these issues and how people act on them. In these cases the photographer also often advocates for the people impacted, trying to draw the public’s attention to the topic documented.
In my vision, however, Social Documentary Photography does not always have to be about ‘big’ issues: for me, it means documenting everyday life as I see it happening around me.
Although this genre of photography (usually) is created as ’straight photography’ about which I wrote previously on this blog, I realize that I can not be fully objective. By selecting my subjects, by making composition decisions, I already create a specific narrative that is guided by my observations and questions. That narrative can be emphasized by the accompanying text to the images.
It is important to keep in mind that this type of photography at its essence combines multiple images that are related to each other from a subject matter and/or storytelling perspective, and usually concerns long(er) term projects. This as opposed to street photography, which also is focused on recording everyday life, but in a single-image, candid, fashion.
Guided by my vision of what Social Documentary Photography is and my urge to show the viewer the not-so-obvious using the storytelling narrative, I aim to create images for my essays that tell a story, inviting the viewer to ponder questions about our society, environment, and how we as people live together.
More resources on documentary photography
Documentary photography is a wide-ranging form of fine art photography that can probably be defined in many different ways. The goal of the documentary photographer is to create an accurate representation of the subject. Here's another useful resource to read for tips on documentary photography.
Why Street Photographers Should Watch Silent Movies
How Watching Silent Movies Will Improve Your Street Photography
Last week, I saw a funny clip on Facebook: a Stan Laurel & Oliver Hardy dancing scene with Chubby Checker’s …
How Watching Silent Movies Will Improve Your Street Photography
Last week, I saw a funny clip on Facebook: a Stan Laurel & Oliver Hardy dancing scene with Chubby Checker’s ‘Let’s Twist Again’ added as music. It was extremely entertaining and amazing how the dancing filmed in the twenties matched the music from the sixties (or vise versa).
Watching this clip, however, also made me realize that street and documentary photographers should watch silent movies to help them improve their photography.
Read after the break, which has one of the greatest silent movies of all time, why.
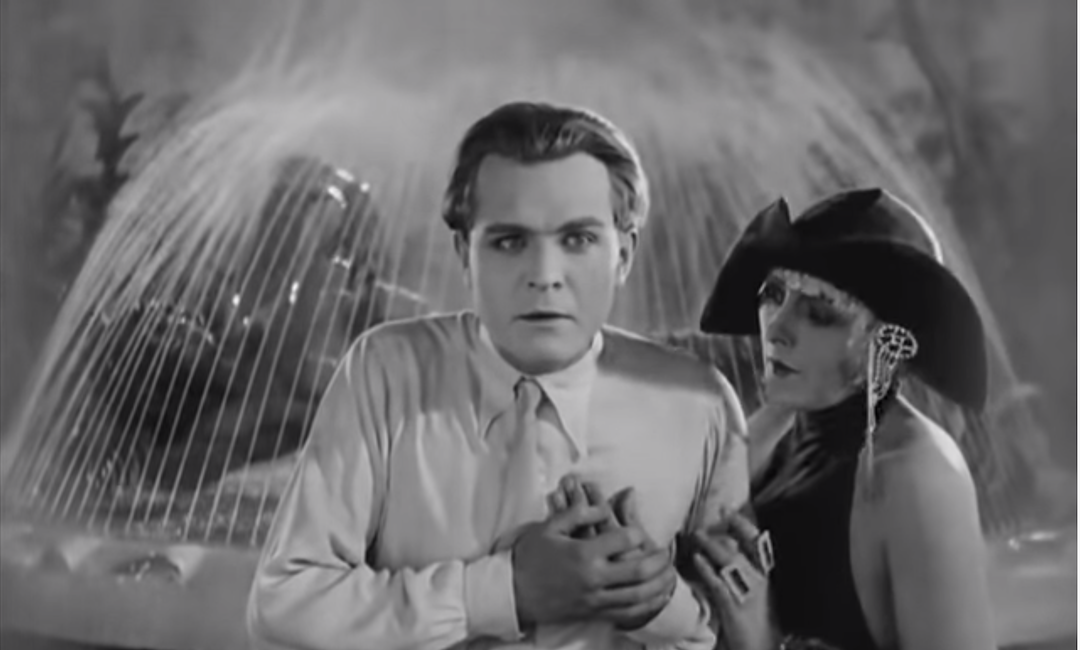
The Complete Metropolis, 1927, Silent Movie, German, Public Domain Movie
By: Public Domain Movies (https://www.youtube.com/channel/UC69JYCM8l93_G8iSR5Dowjg/videos)
It is all about storytelling!
The creators of the silent movies were all exceptionally skilled in telling stories by using composition, non-verbal expression, and sequencing.
Without the availability of sound (the spoken word or music) and only using limited intertitles, they had to build their narrative by showing the viewer the most important scenes.
This was not only true for longer features like Fritz Lang’s ‘Metropolis’ as shared above, but this was even more important for the shorter, often slapstick, movies that were produced. The movie needed to be able to show the viewer with a couple of short scenes what the story was.
And is this not similar to what the street and documentary photographer needs to do: telling a compelling story by using a limited number of images (sometimes only one)?
Watching silent movies learns us how to select scenes (individual images) and how to sequence them to maximum effect; using wide-angle, medium-angle and close-up compositions to tell our stories.

2019-2020 A Year Gone, A New Year Ahead
Reflecting On 2019 And Looking Forward To 2020
Another year almost has gone again, and what a year it was…
Reflecting On 2019 And Looking Forward To 2020
Another year almost has gone again, and what a year it was.
Before reflecting on 2019 and looking forward to 2020, however, I would like to thank my readers and followers of this blog and my Instagram, Facebook, and Twitter accounts! It is great and inspiring to know that there are folks out there who are interested in my work and thoughts: THANKS!
2019: a year of change
2019 was a year of limitations and a year of change: for my photographic work and for my personal life.
For image management and editing, I moved from using LightRoom to using ON1.
I left Zenfolio as my website and blogging platform for Squarespace.
After reflecting on what type of photography I want to work on going forward, I changed my main website to focus on street and social documentary images.
I still want to create fine art images, and moved to display and sell those to Picfair
I spent 9 months on assignment in South Africa. While it was good to see and work with the team there again it put quite some restrictions on my photography. The Kameraz photo walk was a highlight and I create several images that might end up in an essay on being on assignment without my family.
End November I got the message that I was part of a cost-cutting reduction in force exercise with my employer for 19 years.
2019: Goals and Achievements
Now let’s have a look at the goals I set for 2019 and see which ones I have accomplished.
Continue with digital photography
This goal definitely has been accomplished, and the purchase of the Fujifilm X100F definitely helped. It is a great camera for street photography and I used it quite extensively, to the point that I almost made no images with the X-Pro1;
Do film photography if and whenever possible, looking at it as a bonus
Surprisingly, I create more film images than I expected when leaving for South Africa. After discovering a photo lab just 30 minutes from the office and then being able to buy a Leica M4 with a 50ies Summaron lens for a very good price I was able to start working with film quite a lot.
Continue to publish PicTales, Haiku, Essays, and general art and photography articles
Although I kept my blog posts going at a steady pace, I abandoned PicTales and Haiku completely in favor of general art and photography articles. My decision to focus on street and documentary photography also impacted the type of articles I published.
Continue to offer open edition prints for sales through this website
Focusing on the website and blog on street photography and essays, I moved away from selling prints through the website. I continue to produce and sell fine art prints, which now are available on my Picfair page.
Continue to submit to Calls For Entries and Contests
I submitted a couple of images to The Glasgow Gallery Of Photography, some of which have been accepted. So I consider this goal accomplished too.
Work on two new photography projects
Although I created some images for a possible project about going on an international assignment on my own, this goal has not been accomplished to the extent I would have wished.
Use the limitations set on equipment and time available to focus on specific subjects and types of photography, and learn, learn, learn.
Being on assignment to South Africa without my family totally changed how I spent my time off. As a consequence, I have been able to watch a lot of YouTube movies about photography, the history of photography, and photography lessons.
I also learned a lot from using almost exclusively the Fujifilm X100F and Leica M4. Which, in addition, helped me to decide on what photographic genre I want to focus on for my main photographic endeavors.
So, basically, even with the restrictions of place and opportunities I experienced in 2019 I am quite happy with what I was able to accomplish.
Now, after the break, let’s have a look at my objectives for 2020

2020: moving forward
Starting with my employment situation; as I said to my team when I shared the news of my redundancy: we not always can influence the change we have to go through, but we can influence how we react to that change. I don’t know where I will end up, not even if we possibly have to move to another region of the US, but I am looking at new opportunities as we speak. And as the saying goes: when one door closes, other doors will open.
Being at home for a while also will provide me with some quality time with my family, and a period of being able to spend more time on my photography.
Every cloud has a silver lining, so to say.
Regarding photography, I have set a couple of straight forward goals which I should be able to accomplish:
Focus on Street and Social Documentary Photography;
Work on one or two documentary projects;
Continue to create Fine Art Photography images and offer these for sale at Picfair;
Continue to work with digital and film.
Let’s see what the year will bring and approach it in a positive and constructive manner.
Thank you again for reading and following and all the best wishes for 2020 to you all!
Eric

Learning From The Masters: Jill Friedman
Jill Friedman: The Human Face Of Photography
Earlier this year we lost one of the giants of social documentary photography: Jill Friedman (19 October 1939)…
Jill Friedman: The Human Face Of Photography
Earlier this year we lost one of the giants of social documentary photography: Jill Friedman (19 October 1939) was an American documentary and street photographer who was active until her death on 9 October 2019.
Although not trained as a photographer, and only becoming active in the late sixties, she became one of the great photographers of the 20th century.
Searching for more information on several photographers whose work I admire, I discovered the documentary below. It has many take-aways I learned from Freedman’s work.
What me most struck when looking at her work, and also the presentation below, is her human approach to photography. There seems to be a real connectedness between her and her subjects: almost if she is able to catch the soul of the people she photographed.
With her down to earth approach to photography and people, she also was able to rethink her opinion about people. Take for example her thoughts about cops as mentioned in the video.
She had a quite outspoken opinion about things which, naturally, had an impact on what and how she photographed. This, however, makes her photography really ‘raw street’: it is all about real life and not, as we nowadays see a lot in street photography, about aesthetics, shadows, and other more technical photographic aspects.
Jill Freedman - Documentary Photographer
A 2016 documentary from the New York City Visual School of Arts

How To Create A Black And White Negative With ON1
Four Easy Steps To Create Your Own Black And White Negatives
Do you want to print images in a darkroom but you don't have a film camera? Or do you have that great digital…
Four Easy Steps To Create Your Own Black And White Negatives
Do you want to print images in a darkroom but you don't have a film camera? Or do you have that great digital image you wish you had a traditional black and white silver halide print of it? And with some printing techniques you don't even have to have a darkroom (read on to the end to learn how).
In this article, I am going to show you how you can create black and white negatives from digital files in ON1.
Although you can do this with color images, it is far easier and the effect of what you are doing is more clearly visible when using an image that is black and white already. So use one of your black and white images, or first convert a color image to black and white.
For this example I am going to use a black and white image of an old coral, that was selected for the CRUTHACHADH show of The Glasgow Gallery of Photography.

Step 1: Go To The Effects Section Of the Edit Module
After selecting your image in the ON1 Browser and going to the Edit Module, you click the Effects button to add a filter. As you see, I also selected the Levels button at the top. This is not necessary, but it shows me the histogram which is helpful in case I would like to check if I wanted to make some exposure changes first.

Step 2: Select Curves In Effects
Click the Add Filter button and select Curves


After doing this, you will see the curves section as shown below.

Step 3: Move The Sliders
The next thing you want to do is moving the left slider all the way to the top (see first image below) and move the right slider all the way to the bottom (see second image below).


And that is basically all. After having reversed the curves sliders, as shown above, the image should look as in the screenshot below.
Congratulations! You just created a negative black and white image in ON1.

In a couple of easy steps, you went from a digital positive image to a negative:

Step 4: Creating The Hard Copy
Now that you have created your negative, you probably want to use it. In order to do so, you should print it on a transparency.
While you can print at several sizes (for example to use in a darkroom enlarger), I recommend starting with printing your negatives at Letter or A4 size. I will explain below why.
How To Print Your New Negative?
While you can print your negative on transparency at 135, or any medium format size to use in an enlarger, I recommend to print it at letter or A4 size.
By doing so you can create nice big contact sheets, and you don't even need an enlarger. A great technique to use this way is making cyanotype prints, which can be easily done at home: you prepare the paper with the emulsion, lay the negative on it, and leave it in the sun for a couple of hours.
Are you ready to start producing your own negatives and (cyanotype) prints?

What Is The Difference Between Street And Documentary Photography?
Street Photography And Documentary Photography, Is There A Difference?
As mentioned earlier on my social media pages and on my blog: going forward I will focus on street and
Street Photography And Documentary Photography, Is There A Difference?
As mentioned earlier on my social media pages and on my blog: going forward I will focus on street and documentary photography on my website, while fine art images are being moved to Saatchi Art.
There seems to be a bit of a debate about whether street photography is a sub-genre of documentary photography or not.

Let’s first look at some definitions:
“Street photography, also sometimes called candid photography, is photography conducted for art or inquiry that features unmediated chance encounters and random incidents within public places. Although there is a difference between street and candid photography, it is usually subtle with most street photography being candid in nature and some candid photography being classifiable as street photography. Street photography does not necessitate the presence of a street or even the urban environment. Though people usually feature directly, street photography might be absent of people and can be of an object or environment where the image projects a decidedly human character in facsimile or aesthetic.”
“Documentary photography usually refers to a popular form of photography used to chronicle events or environments both significant and relevant to history and historical events as well as everyday life. It is typically covered in professional photojournalism or real-life reportage, but it may also be an amateur, artistic, or academic pursuit.”
The keyword, for me, lies in the word “chronicle” in the Documentary Photography definition that says “…to chronicle events or environments…”
Here, again, Wikipedia is a time saver by providing a good definition: A chronicle (Latin: chronica, from Greek χρονικά chroniká, from χρόνος, chrónos – "time") is a historical account of facts and events arranged in chronological order, as in a timeline.
When we talk about “…a historical account…arranged in chronological order,…” we need to have multiple images!
While I agree that Street Photography is documenting what is happening on the street, it, usually, is the lack of multiple images that record an event in chronological order that makes it differ from Documentary Photography.
Street Photography often is candid (not: snapshot!) photography: consisting of single images. Even when several Street Photography images are taken minutes apart they often don’t necessarily relate directly to each other; the only common factor being the place where the images have been taken.
The moment, however, that a story is being told with multiple images, it for me becomes Documentary Photography.
And we need to keep in mind that Documentary Photography does not need to focus on big events (e.g. war conflicts, demonstrations, political events); it also can be documenting a local event, or a period of someone’s life, or anything else that usually would not make it to the big news media.
Street Photography versus Documentary Photography: maybe a small nuance, but one that is important to me. Both genres appeal to me and I am in the process of changing my website accordingly (watch this space! 🙂)

What You Need To Know About Straight Photography
How Straight Is Straight Photography Actually?
When shooting candid street images and when working on a documentary project, I want to adhere to the…
How Straight Is Straight Photography Actually?
Straight Photography: what is it?
When shooting candid street images and when working on a documentary project, I want to adhere to the rules of 'straight photography'.
This means that I should not manipulate the images in digital processing, other than converting to black-and-white, removing dust spots and, if necessary, adjusting exposure.
As a consequence, I do not allow myself the following:
cropping
removing anything from the image
adding anything to the image
“Pure photography or straight photography refers to photography that attempts to depict a scene or subject in sharp focus and detail, in accordance with the qualities that distinguish photography from other visual media, particularly painting.
Although taken by some to mean lack of manipulation, straight photographers in fact applied many common darkroom techniques to enhance the appearance of their prints. Rather than factual accuracy, the term came to imply a specific aesthetic typified by higher contrast and rich tonality, sharp focus, aversion to cropping, and a Modernism-inspired emphasis on the underlying abstract geometric structure of subjects.”
Why do I want to apply these rules?
For me, street and documentary photography need to provide an objective account of what I saw when creating the image. Because I want to use these two (related) types of photography to document what is happening in the world I live in, it is my objective to provide the viewer with an image that is exactly depicting what happened. Nothing less, nothing more.
Before sharing the biggest challenge this approach offers me, I want to provide a brief explanation of why I think cropping should not be allowed when following the rules of straight photography.
Whereas it is quite clear that an image will be altered when something is added to or removed (e.g. people, lamp posts, other objects that might impact the esthetics of the image), cropping too is removing something from the original image. Although cropping could be justified by saying that it helps to focus the viewer towards the main subject (or message!) of the image, this, in my opinion, should have been done when creating the image in-camera and not afterward.
Adjusting an image in post-processing is something that is really a 'no go' for documentary photography, as might become clear from quite a few controversies during the past years related to documentary photographers who actually changed the content of their images in post-processing, and the fact that the World Press Photo organization sharpened their rules a couple of years ago as a result of these controversies.
My challenge
Looking at the principles of straight photography and reviewing some of my images, however, made me realize that even adhering to these principles does not make street and documentary objective: the photographer makes the decision regarding what to include in the frame when creating the image. this in-camera cropping, so to say, and deciding where to focus the image - where to focus the viewer - is a very subjective choice.
A subjective choice that will highly impact the message the image conveys.
An example
The image below (which I created during the Women's March 2017 in Asheville, North Carolina) has two main subjects: a woman holding a sign up with the words "strong women, know them, be them, raise them" and another woman walking away with a sign pointing downwards under her arm and looking at her phone.

Whatever message you as viewer read from this image, I - the photographer - choose to capture both women in the image, creating a mood, a feeling, and influencing how you perceive what is in the frame.
Now have a look at the next image.

This obviously is the same image as the previous one, but I cropped it (in ON1) to exclude the second main subject, to exclude the woman walking away.
Does this change the impression, the message the image conveys? I think it does but it is, of course, you, the viewer, who reads this message in your own specific way.
The interesting part is that I could have done this 'crop' in-camera. Instead of creating the image as I did (the first one) I could have moved closer to the lady with the sign and create the image as I did in post process.
Even while aiming at objectivity, every street and documentary photographer makes subjective decisions when creating their images. And that brought me to question how 'straight' straight photography actually is.
Conclusion
My conclusion is, that 'straight photography' only can explain what from a technical perspective has been done with an image. 'Straight photography' never can mean 'objective photography': The moment the photographer decides what is in and out of the frame her or his subject opinion about what is being captured defines the final result.
This, in my opinion, does not disqualify straight photography as a technique but it made me realize that it should not be confused with providing an objective account of what happened.
What do you think? Share your thoughts in the comments below!

Change Is Inevitable
Change Is Coming: For My Photography And For This Site
When I look back at the images I have created since I started taking photography more seriously (i.e. when…
Change Is Coming: For My Photography And For This Site
When I look back at the images I have created since I started taking photography more seriously (i.e. when I got my first SLR in the late 1970s, a Ricoh XR-1) I can see that there has been some documentary-style impact from the beginning, mixed with what might be called the seeds of fine art.

I created images from the disappearing remnants of the coal mining industry in my home town, bad attempts to build high rises and social housing, and the changing environment of the small village where I lived.

In addition to these images, I tried my hand at model photography (no not taking images of nice-looking men and women - I was too young for that - but from plastic airplane and ship models) and creating artistic images of railroads and statues. Probably pretty childish and simple looking back at it now, but there was a beginning...
With the advance of my equipment, and traveling and living abroad, my photography became more focused on cityscapes and architecture.

In South Africa, I got even better gear (Nikon D700, and 20-70mm f/2.8 and 70-200mm f/2.8 lenses) and my photography became wildlife-focused. Probably not a surprise.

After moving to the US I quickly discovered that the availability of huge wildlife parks and animals in the Greenville, SC area is quite limited. I also didn't want to lug a heavy DSLR and lenses with me anymore. I changed my cameras to two extremes: the small, inconspicuous Fujifilm X-Pro1 and the huge and tripod-based Mamiya RZ67 ProII.
With this change of cameras and re-discovering the images I created with my first SLR, photography became more focused on fine art and I got a renewed interest in storytelling.


Then came the X100F and soon thereafter the M4. Both were game changers for my photographic thinking and style: storytelling evolved into street and documentary photography.

At this point in my photographic development, I have made the decision to focus on street and documentary photography.
I will continue, however, to produce so-called fine art images. And to prevent confusing the viewers of my web site, I have decided to move my fine art images. After looking at several alternatives I selected SaatchiArt: it is a renowned platform, convenient to use for me and any prospective buyers of my prints, and SaatchiArt produces quality prints without me having to be involved on a daily basis.
Street and documentary photography, however, will have my focus. I already have several projects in mind I will work on when back in the US. And I am currently working on a project here in South Africa. This also will mean that the set-up of my site will change.
More to come or, as they say: "watch this space".

Rosebank Photo Walk
Impressions From The 2019 Kameraz Rosebank Photo Walk
One of the events organized by Kameraz in Rosebank for their 21st anniversary was a photo walk through..
Impressions From The 2019 Kameraz Rosebank Photo Walk
One of the events organized by Kameraz in Rosebank for their 21st anniversary was a photo walk through the Rosebank area. It was very well organized in cooperation with Joburg Photowalkers and Johannesburg In Your Pocket City Guide: from the introductions, to the walk guide, to the security team that was provided during the walk.
Below are some images I created during the walk. These have not been curated yet and some will be added to the Street Photography portfolio later. I also created some architectural images, not in this selection, that might be added to the Cities and Architecture portfolio.
All images are direct out-of-camera jpegs from the Fujifilm X100F, with only minor post processing exposure adjustments in ON1 for some images.


Learning From The Masters: Bruce Gilden
The Strength Of Photography...You Strive To Make Your Picture
Last week I watched an interview with Bruce Gilden on the Street Photography site and especially one…
The Strength Of Photography...You Strive To Make Your Picture
Last week I watched an interview with Bruce Gilden on the Street Photography site and especially one thing he said struck a chord with me: "The strength of photography...you strive to make your picture."
In order to create great images, you need to know about the history of (street) photography, and you need to photography who and what you are.
To start with knowing photography history, what images have been created before and how these images have been created: you need to learn by looking. Look at other photographer's work, understand what they did and why they created certain images, and learn to know what you like and don't like. And then take your photography from there.
The main message, however, is 'learn'. Do not imitate what you see. Make your own pictures. That is why in my opinion looking and learning from other photographers best should be done by looking at images in photo books or at exhibitions. I know that there are a lot of online images being created new every day: just have a look at Twitter, Instagram, or Facebook. But learning from photo books and exhibitions is better for two reasons:
printed images look (and feel) different than images on a screen;
images posted on social media are often just posted to get the 'likes', and as a result, often are already 'copies' of other images that got many 'likes' and led to the poster getting many 'followers'.
After having learned about photography, make sure that you create images that are aligned with what and who you are, and with your interests. Don't create images because someone else was successful with similar images, don't create images that are not aligned with the stories you want to tell.
Take what you learned and bring it to the next level, improve on it, and develop your own style, striving to make your picture.
This process will take some time. So, to be or become a photographer who creates strong images you need to be patient and don't give up too soon.
This interview strongly resonated with me and made me realize that my photographic journey is not over yet. There is a lot more to learn, a lot more to explore.
For the full interview:
Bruce Gilden, 9th May 2017.
Video by: Street Photography

A Cure For Boring Hotel Rooms
How Documentary Style Branding Photography Can Improve The Guest Experience
Over the years my day job has provided me with many ‘opportunities’ to stay in hotels…
How Documentary Style Branding Photography Can Improve The Guest Experience
Over the years my day job has provided me with many ‘opportunities’ to stay in hotels.
And except for, maybe, of one or two outstanding exceptions I need to say that hotels and hotel rooms, in general, are very boring.
Partially because of the standard layout of the rooms (how creative can you be designing one room, with one or two beds, and a shower/bathroom?).
Partially because of the pictures and other art on the walls: usually run-of-the-mill images or abstract paintings that have no connection with the hotel, its people, or its environment
Would imagery in hotels not be more engaging when it would show, for example, the people who work in the hotel in a documentary, street photography style?

That would connect the rooms and the guest experience more directly with what is happening in the hotel, and it would provide the hotel an opportunity to recognize and celebrate the people who make the guest’s stay comfortable and pleasant:
Showing hotel staff being dedicated, having fun at work, doing a great job;
Showing how much work hotel staff puts in every day to provide the guests with a great experience;
It would allow a peek behind the scenes, and on a subconscious level provide reassurance to the guests that they are well cared for.
Examples of this type of photography can be:
Cooks in the kitchen
Maids making the beds
The pool guards
Setting the dinner table
Using this type of documentary/street photography style images not only can be used to increase the room environment; this style can also be used throughout the hotel: corridors, lobby, lounges, etcetera.
In addition, documentary-style photography can be used to link the hotel to its (immediate) surroundings: e.g. the valet boys at work, or showing a picture of the cook in the kitchen next to a picture of the cook shopping for fresh groceries; or show people participating in activities near the hotel.

The type and style of these images also can be adjusted to align with the branding of the hotel and the lifestyle of your guests. For example sportive, classic, modern, or black-and-white versus color. The possibilities are endless, and the results would make for a more enjoyable hotel stay.
Let's no longer settle for the standard boring hotel images, let's work towards a fresh and engaging style.

Taking The X100F To Madrid
Street Photography With The Fujifilm X100F in Madrid
Last week I spent a couple of days in Europe to meet my wife and youngest daughter during my first leave
Street Photography With The Fujifilm X100F in Madrid
Last week I spent a couple of days in Europe to meet my wife and youngest daughter during my first leave after starting my assignment to South Africa in March this year.
True to my original plan, I took the trinity with me with the intent to shoot some street photography in Madrid and The Hague. Although I have not processed all digital images yet, and I still need to send the film rolls to the lab, I already want to share two images to show what the X100F is capable of.
From a shooting perspective, it is interesting that the Leica M4 saw most use. My wife brought the Voigtlander VC II light meter from home, which made defining aperture and shutter speed very easy without having to rely on the sunny 16 rule.
The Fujifilm X100F was, according to plan, used during night time while I did not use the Fujifilm X-Pro1 at all. Maybe I am more comfortable with the 35mm (full-frame equivalent) focal length than I thought?
Anyhow, below are two first impressions from the shots with the X100F. Bot images have been converted to black and white in ON1: although I have in-camera black and white jpegs the Acros + Red Filter setting was too contrasty. I probably need to change my settings if I am going to use the X100F more for night scenes.
I will share more images of this trip soon!


Learning From The Masters: Saul Leiter
Saul Leiter: The Man Who Brought Me Back To Color
Saul Leiter (3 December 1923 - 26 November 2013) was an American photographer who was active from…
Saul Leiter: The Man Who Brought Me Back To Color
Saul Leiter (3 December 1923 - 26 November 2013) was an American photographer who was active from the mid-1940s until his death in 2013.
Leiter was in the first instance mostly known for his fashion photography for Vogue, Harper's Bazaar and other big magazines. His personal work, which was mostly in color, was only discovered and printed in the later stages of his life, from the 1990's onward, and only really recognized and appreciated after his death.
Searching for more information on several photographers whose work I admire, I discovered the documentary below. It has many take-aways I learned from Leiter's work and his life.
From a photographic perspective, the biggest discovery was for me how he captured color. While I have been focusing on black-and-white photography for the last couple of years, his work showed me the beauty of color work and enticed me to start experimenting with color photography again.
His use of color in composition is very abstract. The human form, for example, even when recognizable is often transferred to an abstract that complements the composition of the image rather than being the subject of the image.
But it is not only his technical approach to photography and his immense body of work that inspires me.
In the video, he shares his, what I would like to call, philosophical approach to photography. Although being a bit the 'grumpy old man' type in the documentary - and keep in mind that this was filmed just one year before he passed away - he has a lot of good life lessons for the aspiring photographer and professional alike.
He displays a lot of humility about his work and his own importance. And I like how he also downplays the importance of other people: "a window covered with raindrops interests me more than a photograph of a famous person."
And although he recognizes that "nothing in photography is new", his continuous search for beauty kept him creating images until the end of his life, "enjoying taking pictures, not caring too much what others think of your work."
To me, his is a great example of continuous development, continuous looking for subject matter. As he said "everything is suitable to be photographed. Everything is a photograph" and "photography teaches you to look and appreciate all kind of things."
He just "enjoy[ed] catching certain moments", and is that not the essence of street photography?!
In No Great Hurry - 13 lessons in life with Saul Leiter
A 2012 documentary by Tomas Leach; shared on YouTube in 2019 by Pixeldust